Getting Started with Flamingo Carotene
Precondition
Install npm (https://www.npmjs.com/get-npm)
Intro
This "Getting Started" Tutorial will guide you through the initial steps to have flamingo carotene running for your flamingo project. The Flamingo Carotene will go inside a folder "frontend" in your flamingo project.
Once you are done this will be the folder structure:
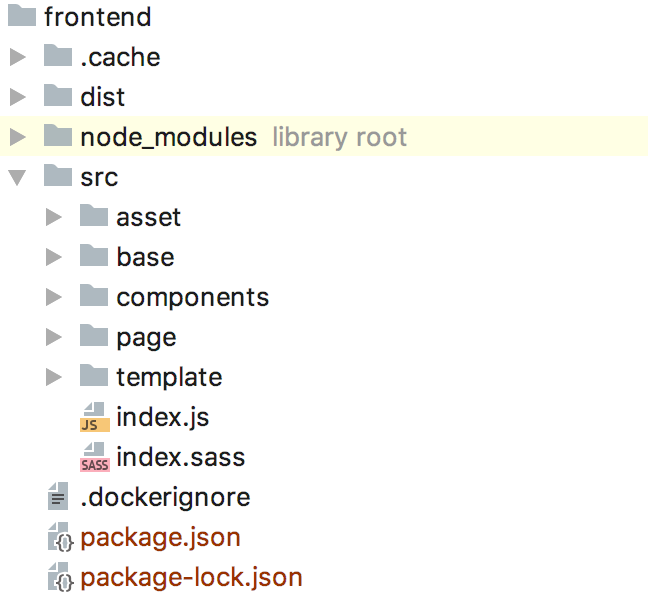
- "src" folder is where all your frontend code is living.
- "dist" folder is where the frontend build result is saved to by the build command. This folder is not part of version control.
- "node_modules" Managed by npm - contains the dependencies and should not be manged by version control.
- package.json - the package informations of your frontend.
- package-lock.json - the pinned versions of your (npm) dependencies - should be under version control.
And now lets walk through the steps:
1. Prepare the Frontend
Inside your Flamingo project folder:
mkdir -p frontend/src
cd frontend
npm init    # just confim default values
npm i -D flamingo-carotene-core flamingo-carotene-pug
This will first create the folder frontend/src - this is where the code for your frontend lives.
After this we use npm to initialize our frontend package and add the basic flamingo_carotene modules.
So after executing the code above your frontend project has the following npm modules included:
flamingo-carotene-core- includes the basic commands and core logicflamingo-carotene-pug- includes the Build logic to work with pug
You now can add your first page template with pug:
mkdir -p src/page/
echo "h1 Hello World" >  src/page/index.pug
And with this command you can start building your first frontend:
npx flamingo-carotene build
The result is stored in the folder frontend/dist.
The dist folder is the folder where the flamingo server will later read the templates.
So the principal development process for frontend is: (1) you work inside src folder and the frontend build process writes into the dist folder which is read by the flamingo server.
(You should make sure that frontend/dist and all other npm cahce folders are added to your .gitignore file to avoid having them under version control)
1.1. Add the default error templates
Add the templates for the default error pages that flamingo will use for error handling later.
Sp please create the following files inside the folder frontend/src/page/error/
- 404.pug
- 403.pug
- 503.pug
- withCode.pug
With a content like this (adjust it to your needs):
html
  body
    h1.center 503

    if config('debug.mode')
      .errorDebug
        .errorDebugTitle Debug:
        pre.errorDebugContent.center= error
Then don't forget to recompile the templates with: npx flamingo-carotene build
1.2. Adding typical flamingo-carotene modules
1.2.1. Sass via webpack:
Probably you also want to use Sass to write your CSS - therefore we add the webpack module to our frontend:
Adding webpack carotene module:
npm i -D flamingo-carotene-webpack
Now add the entry index.js file and use this to load the sass files:
echo "import 'index.sass'" >  src/index.js
echo "@import 'FILEPATTER*.sass'" >  src/index.sass
You can now start adding *.sass files to your templates and will get the css compiled into the dist folder automatically when you run npx flamingo-carotene build
1.2.2. Copy assets
In order to use assets (images, webfonts..) in our frontend and make sure they are also copied over to the dist folder during build you need to add:
npm i -D flamingo-carotene-static-asset
2. Prepare the Flamingo project
If you already have a running Flamingo project, this are the steps you need to adjust in order to use the templates generated by Flamingo Carotene:
2.1. Add the pugtemplate module in your projects main go file:
import (
  // ...
    "flamingo.me/pugtemplate"
    // ...
)

func main() {
    // ...
    flamingo.App([]dingo.Module{
      // ...
      new(pugtemplate.Module),
      // ...
    })
}
Thats it. So we just add the pugtemplate engine to the bootstrap and can start using the pug templates. (Make sure other flamingo template engines like gotemplate are removed.)
3. Next Steps
After the first steps you can continue with:
- Read more about the used Tools "pug" and "sass" (see link list below)
- Read more about Atomic Design
- Use the
flamingo-carotene-webpackpackage to use webpack to build JS and CSS - Use the
flamingo-carotene-dev-serverpackage to benefit from Hot reloading during development - Use the
flamingo-carotene-behaviorpackage to add dynamic javascript for your design components - Use the
flamingo-carotene-state-managerpackage to use the page state pattern to communicate and manage state between design components.
4. Links to used tools
Read more about the tools used in Flamingo Carotene modules:
- NPM
-
https://www.npmjs.com/
-
PUG for templating
-
https://pugjs.org/api/getting-started.html
-
Sass for CSS
-
http://sass-lang.com/
-
Webpack for JS / CSS Build
- https://webpack.js.org/